Xen Users Guide: 
| ||
|---|---|---|
| Prev | Chapter 3. Using the Xen Roll | Next |
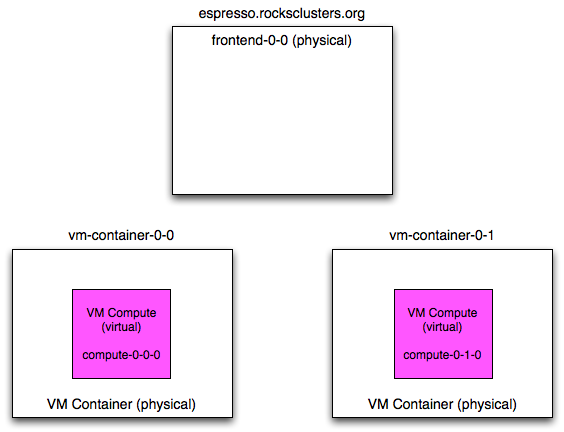
In this scenario, the frontend is a physical machine (not a VM) and the compute nodes are virtual machines.

In the above picture, "frontend-0-0" is a physical machine (with the public name of "espresso.rocksclusters.org". The physical machine "frontend-0-0" controls two VM compute nodes named "compute-0-0-0" and "compute-0-1-0". This means that "compute-0-0-0" and "compute-0-1-0" are configured by "frontend-0-0". This is opposed to the "virtual cluster scenario" (Installing Virtual Clusters), where the virtual frontend ("frontend-0-0-0") configured the VM compute nodes, and the physical machine that housed "frontend-0-0-0" only started and stopped the virtual compute nodes.
In the common case, you will execute three Rocks commands over the lifetime of your VMs: add (to add VM info to the database), start (to boot or install a VM) and stop (to shutdown an installed VM).
To add a VM to the system, you need to associate a VM with a physical machine (i.e., a VM container) and you need to assign an appliance type to the VM. Here's an example:
# rocks add host vm vm-container-0-0 membership="Compute" |
The above command will output a message similar to:
added VM compute-0-0-0 on physical node vm-container-0-0 |
This tells us that, in the database, the compute VM named "compute-0-0-0" has been assigned to the physical machine "vm-container-0-0".
The next step is to install the VM.
VMs are installed with the start. Here's how to install the VM that was added above:
# rocks start host vm compute-0-0-0 |
 | After running the command above, you may see the following message:
This is not a problem. The above means the file that will be used for the VMs disk space was not present when the VM was started. The "rocks start host vm" command eventually creates it and starts the VM. That is, while you may see the error message above, the VM is actually running and installing. |
The above command will start the standard Rocks installation process for the VM named "compute-0-0-0". After the installation process initializes the network inside the VM, you can monitor the installation just like a physical machine installation by executing:
# rocks-console compute-0-0-0 |
After the installation completes, the VM will reboot. After the VM boots, you can interact with the VM just like any other physical machine.